New Seats – Re-upholstering the Seating Area
RE-UPHOLSTERY OF OUR MOTORHOME SEATING
The largest single project to date we have undertaken in our motorhome re-fit is the re-upholstery of the van seating.
Not only was it a case of re-covering the existing seating, but we wanted to change the seating configuration. It was not laid out very well to begin with, so we worked out the new configuration and drew out a plan for measurements.
This meant we would have to order new foam and baseboards. Basically it was a complete re-fit and the old seating would be dumped.
All good fun when yet again, neither of us had ever done any upholstery before. It is amazing the new skills you can acquire when you want to work within a tight budget!
If you take your time and do your research beforehand (as well as following some of our tips) you too can attempt this.
DRAW UP A SEATING PLAN
We had two main reasons for changing the seating configuration.

1. The existing seating arrangement was fragmented. The corner cushions along the cab were too long, leaving a small seat cushion in the middle. The back was also split into 3 sections. We redesigned this to have a longer bench seat along the cab end with smaller cushions in the corners as these would be the least used, and make the backrest one long section rather than the original three. On the right hand side, there was one small cushion on the end to allow access to the water heater compartment. Again we decided to make this one longer bench seat. Top assess to the water heater is never really required as we have side access both from inside and outside the van, and if it is ever required, it is just as easy to remove the long cushion from the seat box. Finally, there was no way to make up the pull out bed as the existing configuration just didn’t allow for it.
2. The existing seat pads were made from bull nose foam. Whilst this undoubtedly makes a more comfortable seat pad, it also has its disadvantages and we decided to change it to plain rectangular 4 inch foam for the following reasons:
a) It is likely that some seats will be used more than others as people have preference as to where they sit. With plain rectangular foam they can be turned around on a regular basis to even out the wear. There will also be 3 cushions the same size, so these can also be swapped on occasion as well as turned. The turning could not be done with bull-nose foam as it would move the bull nose to the back of the cushion!
b) Having bull-nose cushions also creates problems for making up the spare bed which can quickly resemble an Ordnance Survey contour map of the Pennines across the van and doesn’t create a very comfortable sleeping surface.
c) Plain rectangular cushions are slightly easier to re-cover! 🙂
As is usual with the way we seem to do things out of order, we already had the fabric for the re-upholstery. Being perpetual bargain hunters, when we have an idea to do something in the future and something we may need becomes available at a good price, we will grab it there and then and keep it aside for the project.
I had spotted a clearance sale of fabric on eBay and one of the fabrics on sale was a perfect match for the van. So I ordered 10 metres of sage green heavy chenille upholstery fabric for the bargain price of £35.
Now that we were ready to start the re-upholstery, drawn out the plan and double checked the measurements, it was time to get together the rest of the materials we needed. We have listed these below along with the costs. We borrowed a sewing machine for sewing the seams.
LIST OF MATERIALS
10 metres of heavy chenille upholstery fabric – £35
2 sheets of 6mm MDF for seat baseboards cut to size – £30
4 inch upholstery foam for seat pads and 3 inch foam for seat backs – £210
Spray adhesive (2 cans) – £8
Upholstery wadding 4oz weight – £20
Base fabric 11m – £14
Stanley staple gun – £20
2000 x Stanley staples – £7
TOTAL – £344
It is interesting to note that if we had used our existing foam, the entire project would only have cost us £134.
GATHERING THE MATERIALS
We ordered the upholstery foam from Ace Foam. We chose the firm reflex foam which was recommended for the purpose. Ace foam has a very simple on-line ordering process where you select the shape and exact sizes of each piece of foam needed. Prices are calculated instantly including delivery and payment made on-line via credit card or PayPal. The foam will all be cut to size for you.
The delivery cost to Northern Ireland was also very reasonable for 3 large packages and all the foam was received within 2 days of ordering. I would highly recommend them as the process is so easy and their service top drawer.
The local builder’s merchant was the most convenient option for the MDF plus they had a full board saw. I had drawn out a cutting plan for two 8ft x 4ft sheets of 6mm MDF. I was able to leave the cutting plan with the saw operator and call back 2 hours later to collect all the pieces cut to the perfect size for the seating.
The remainder of the materials (spray glue, wadding, base fabric, staple gun and staples) were ordered from eBay and Amazon, so it was just a matter of waiting a few days for everything to be delivered. I hate the idea of trying to visit different stores or find what you are looking for in huge DIY stores with inflated prices. It is easy to find what you need on-line and the items will be delivered straight to your front door. No fuel costs, no parking fees,and most importantly, no stress!
The foam arrived much quicker than expected, and with the MDF cut and a couple of spare cans of spray adhesive, I was ready to make a start with the first stage.
PREPARING THE SEAT PADS
The first thing we needed to do was stick the foam to the baseboards, so as we matched each base board with its corresponding foam cushion, I sprayed the MDF with spray adhesive and carefully laid the foam cushion on to the MDF. For the larger pieces,it was a two person job, so I placed one end of the foam while Michelle held the other and carefully lowered it into place.

Total pieces were :- 3 x long seat cushions, 2 x smaller corner cushions, 3 x long back cushions, 1 x bed conversion cushion and 4 small pieces which would be multi-functional. Normally they will sit on top of the seat cushions acting as armrests. Turn them over and they create handy individual drinks trays. Finally, they can be placed across the pull-out bed at the cab wall to make the spare bed even larger. A piece of genius on my part!
CUTTING THE FABRIC
While the glue was drying, we started to cut the fabric. We were able to split a width of fabric, one piece covering the base cushion, the other covering the back cushion. We worked off the longest lengths (normally the back cushions).
I had a plan with all relevant measurements to hand which made cutting the fabric an easy job. Leaving a 6cm overlap on each side to bring over the bottom edge of the MDF for stapling. Also remember the sides of the foam on each side which measured 10cm on the 4″ foam and 7.5cm on the 3″ foam. Each piece of fabric needs to be (6 + (10 or 7.5cm)) x 2 = 32 or 27cm larger than the plan measurements.
I cut all the pieces out first and labelled each piece.
MARKING THE CORNERS
The next stage is the most important – it is marking the material in order to sew in the corner seams.
After viewing some YouTube videos on the subject, I laid the fabric upside down on top of the foam pad and pinned down the corner edges to create a tight pocket over the foam. Then sew along the line of pins. At this stage the “pocket” is inside out. Turn it right side out and pull it over the seat cushion.

This video from YouTube shows how this is done for re-upholstering seats for a camper van – it also shows how to pin in an end panel if you are working with bull-nose foam.
We found this method to be quite tricky, trying to pin the material and keep it tight over the foam is difficult. The first cushion revealed a problem with this method- as the fabric is originally inside out, when you fold it the right way, the corners are swapped to the other side of the foam- they do not go to the corner you originally planned. As you can see from the seating plan, each corner cushion has a section cut off one corner. We pinned and sewed the three right angle corners, but of course when the fabric was turned right side out the corners did not correspond with the foam shape. We had to fix this issue.


I wrecked my brain and came up with an alternative (and in my opinion) much easier method of marking and sewing the fabric.
Lay the fabric face down on the floor. Make sure the fabric is pulled tight and there is no slack. Place the foam seat in position centrally on the fabric as shown earlier in Fig A. Take a marker and mark a dot at each corner where the foam touches the fabric. From this point draw two perpendicular lines from the corner. Place a straight edge along the edge of the foam and draw an extended line on each side. Do this on all sides so that you end up marking a right angle at each corner.

Each line needs to extend out beyond the corner by the depth of the foam plus the depth of the MDF. In this case I was using 4″ foam (10cm) and 6mm MDF, so I measured out each line to 10.6cm and marked a dot. I have labelled these point A and B. The corner point is labelled Point C. Another way to measure the length of the line is to fold the material up the side of the foam after you have marked the line and mark where it touches the outside of the MDF. This will be the depth of the seam you want to sew as if you sew right out to the edge of the fabric, you will make it difficult to fold the corners in when it comes to stapling the fabric to the MDF.
Doing it this way, the fabric is sitting on the foam with the right face to the outside and after sewing each corner will fit exactly over the corner it was originally measured for.
Now if you have done this correctly, you will have marked your lines on the back of the material! If you haven’t – its back to the drawing board I’m afraid 🙂
SEWING THE CORNERS
Take a needle and knotted thread – push the needle through at Point A and exit at Point B. Tighten the thread, bringing these two points together and put a couple of lock stitches in to hold them in place. Then fold the material until you get a triangular point at Point C.
You can now sew down the line starting at Point C and ending at Points A and B. Secure your stitching at beginning and end with some reverse stitches to avoid fraying. Trim off excess fabric about 2cm outside the sewing line.
It is important to measure and sew your fabric using just the foam The addition of the wadding to the foam will pad out the fabric and absorb any slack.


ADDING UPHOLSTERY WADDING
Whilst Michelle got stuck into the sewing of each piece, I started covering the foam with 4oz upholstery wadding. I first trimmed the corners off the MDF to remove the sharp point then I cut a small piece of wadding for each end of the foam, the exact size on three sides and a small overlap on the side of the MDF to fold around and staple. I stuck the wadding to the ends with spray adhesive and then cut the main piece of wadding to the exact length of the foam leaving enough width to go down each side, fold around the MDF and staple.


An alternative method is to cut the wadding the same size as the fabric and wrap it around both sides and ends and staple to the MDF. You will need to trim the excess wadding neatly down each of the corners to minimize the bulk.
There is no need to go mad with staples on the wadding, just a few to hold it in place. As you add the fabric and backing cloth – you will be using a lot more staples which will go through all the layers, securing them firmly in place.


To complete this project we bought a Stanley electric stapler and 2000 staples. Make sure to match your staples to the staple gun as its not one size fits all! As our MDF base board was 6mm thick, we used 8mm staples. The electric stapler made the job so much easier and securely placed each staple into the MDF. We did own a hand stapler which we tried to use but it didn’t push the staples in far enough to secure the fabric. Don’t waste your time and energy, make sure you have an electric stapler if you want to tackle your own upholstery. Ours only cost £20 but was worth five times that when it came to speed and power.
COVERING WITH FABRIC
Once the wadding is attached to the foam, it is time to pull the fabric cover tightly over the whole cushion. Lay out the fabric on a flat surface. Turn the seat pad upside down and make sure the pad is fully pushed into the fabric pocket you have made. Now fold the fabric over the MDF and staple. I found it easier to do the ends first, then the sides. Pull the excess material over the MDF with a moderate amount of pressure to tighten the fabric. Don’t pull too hard or you will pull the corners of the foam out of shape. If you see the bottom edge of the foam puckering, you are pulling too tight and should relax your grip a little. With a little practice you will find your own level.

I start at one end, always by pulling on the centre first, applying a couple of staples. Once you have these in place, move to one of the corners and fold the fabric in neatly at the outside edge to form a neat corner. Staple the corner into place. Repeat this process with the next corner and apply some more staples in between the two corners. Move to the other end and repeat the process. The process is the same for stapling the long edges.

When you turn the cushion over you should have a beautifully upholstered seat.

FINISHING OFF WITH A BASE CLOTH
To give your cushions a professional finished look, you can apply a base cloth which costs around £1.50 per metre. Its well worth the money to get a great finish.
Mark out a piece of black base cloth just slightly larger than the MDF base. I used a white china graph pencil to mark the size. Tuck the edges of the fabric in about 2cm down each side as you staple. Staple the base cloth as close to the edge of the fabric as possible. Again start at an end and staple in the centre, then move to the corners and staple. Repeat the process at the other end and then down both sides. Apply plenty of staples around the edge of the base cloth and this will help to hold everything in place.

The total cost of the project was £344 including all the foam, the MDF, fabric, wadding, spray glue, electric staple gun and staples. As you can see we have a very large seating area. If you’ve had your seating re-upholstered or had a quote from a professional we would love to hear about your experiences in the comments below. We’d like to get an idea of professional fitting costs to work out how much we actually saved by doing it ourselves. I’m pretty sure we saved well in excess of £1,000 – £1,500.
Here are some pictures of the seating back in place. First we have the normal seating configuration with the new armrests/tea trays on the top of the seating. The first extension of the bed takes the additional cushion we made to make up a small bed. We will most likely have this as our normal configuration making a day bed to relax and watch TV or read.


Full extension of the bed will be by placing the four armrests across the van, followed by the large seat cushions to make a huge super-king size bed for guests. The only time the extra cushions will be removed is if we are entertaining in the van and need the additional seating area.

WHAT HAVE WE LEARNT?
- Using heavier wadding would give more of the padded upholstery look. We used 4oz wadding but if we were to do this again would prefer to use 6oz or even 8oz weight for extra padding.
- If doing this for the first time like us, use a plain fabric. Anything with stripes or a pattern will mean that you will have to match up the fabric on the seat pads and seat backs. This adds to extra planning and using a plain fabric removes this obstacle.
- We decided in the end to button the seats. If you have large seats like ours, it will be easier for the fabric to sag over time. Using upholstery buttons tightens everything up. Do this just before finishing off with the base cloth. We had to button through our base cloth which leaves the button twine exposed.
- Buy an electric stapler. The best value for money tool I have ever purchased.
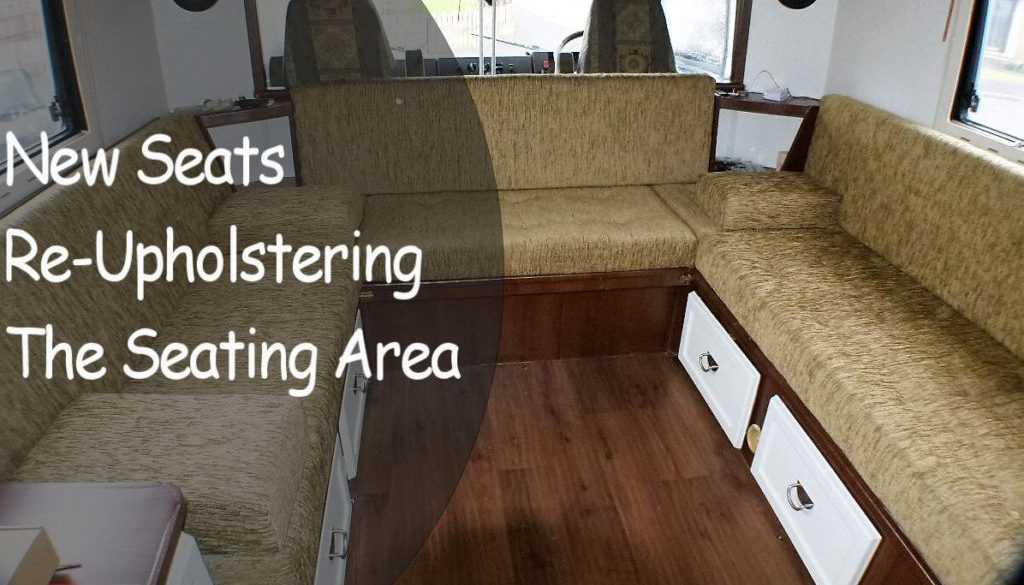
BEFORE

AFTER

We think our new seating area is amazing – but we are slightly biased – feel free to tell us what you think in the comments below.